An introduction to maps and markers
Discussed: MapKit and CoreLocation frameworks — Getting user positions — Flattened spheres — Annotating the map — Pixels versus Coordinates — Tying into the storyboard
I've previously referred to "my students" and by that I meant my students from a iOS/Android development course that I've been teaching at Malmö Yrkeshögskola. I have promised said students that I would deliver some additional material to cover subjects that we didn't have time for in the classroom. The first of these subjects is a introduction to using the MKMapView and the rest will follow on a (hopefully/roughly) weekly schedule.
The sample project code can be found here: iOS MapView Basics. This will not be a complete step-by-step guide, but is meant to be read alongside with the source code from the sample project.
MapKit and CoreLocation frameworks
All projects that want to use the built in map view and positioning services must import the MapKit and CoreLocation frameworks. You get the first hint that this is necessary should be when you see the prefixes for the classes MKMapView and CLLocationManager. The first two letters represents the framework. You're probably used to see NS used: NSString and NSArray for example. All classes starting with NS belongs to the Foundation framework. Another set of often used classes are those starting with UI: UIView, UILabel and UIButton et cetera. All those classes belong to the UIKit framework.
While the Foundation and UIKit frameworks are included from the start you will need to manually link to MapKit and CoreLocation by following these steps:
- In the project editor, select the target to which you want to add a library or framework.
- Click Build Phases at the top of the project editor.
- Open the Link Binary With Libraries section.
- Click the Add (+) button to add a library or framework.
- Select a library or framework from the list and click Add.
From: Project Editor Help: Linking to a Library or Framework
If you're curious about what other frameworks are available, and what they have to offer, you can take a peek at iOS Technology Overview: iOS Frameworks.
Subscribing to location updates
To start subscribing to location updates you'll need to create a CLLocationManager and set your view controller as the delegate. As with most delegates you must also implement a protocol. In this case it's the CLLocationManagerDelegate protocol:
@interface HUWViewController : UIViewController<MKMapViewDelegate, CLLocationManagerDelegate> {
    @private
    CLLocationManager *locationManager;
We're also adding an ivar so that we can store a pointer to the location manager. The next step is to create the actual location manager in the beginning of our view lifecycle, in the sample code this is done in the viewDidLoad method:
// Check if the user has enabled location services.
if ([CLLocationManager locationServicesEnabled]) {
    // Create a location manager.
    locationManager = [[CLLocationManager alloc] init];
    // Set ourselves as it's delegate so that we get
    // notified of position updates.
    locationManager.delegate = self;
    // Set the desired accuracy.
    locationManager.desiredAccuracy = kCLLocationAccuracyBest;
    // Start tracking.
    [locationManager startUpdatingLocation];
}
The only thing that should need any additional comments here is the desiredAccuracy. This tells iOS what accuracy you require for your purposes. The higher the required accuracy the longer it will take to pinpoint the users position. Higher accuracy also means higher power consumption, see CLLocationManager Class Reference. These are your options:
- kCLLocationAccuracyBestForNavigation
- kCLLocationAccuracyBest
- kCLLocationAccuracyNearestTenMeters
- kCLLocationAccuracyHundredMeters
- kCLLocationAccuracyKilometer
- kCLLocationAccuracyThreeKilometers
Reacting to location updates
When we have an acceptable location for the user the location manager will send the message locationManager:didUpdateToLocation:fromLocation: to its delegate. This is the way I have implemented this method in the view controller:
- (void)locationManager:(CLLocationManager *)manager
        didUpdateToLocation:(CLLocation *)newLocation
        fromLocation:(CLLocation *)oldLocation {
    // Check if this is the first time we get a reading.
    if (currentPosition == nil) {
        // Create a map point from the coordinate.
        MKMapPoint point = MKMapPointForCoordinate(
            newLocation.coordinate);
        // Get the relationship between map points
        // and metres at our current latitude.
        double pointsPerMeter = MKMapPointsPerMeterAtLatitude(
            newLocation.coordinate.latitude);
        // Calculate the number of map points that
        // equals a distance of 500m.
        double visibleDistance = pointsPerMeter * 500.0;

        // Create a rectangle that is a kilometer at
        // the sides and is centered on our position.
        MKMapRect rect = MKMapRectMake(
                          point.x - visibleDistance,
                          point.y - visibleDistance,
                          visibleDistance * 2,
                          visibleDistance * 2);

        // Tell the map view to show the rectangle.
        [self.mapView setVisibleMapRect:rect animated:YES];

        HUWMapAnnotation *annotation =
            [[HUWMapAnnotation alloc]
              initWithCoordinate:newLocation.coordinate];
        annotation.name = @"Hugo Wetterberg";
        annotation.email = @"hugo@wetterberg.nu";
        annotation.age = 30;
        [self.mapView addAnnotation:annotation];
    }
    // Update the current position.
    currentPosition = newLocation;
}
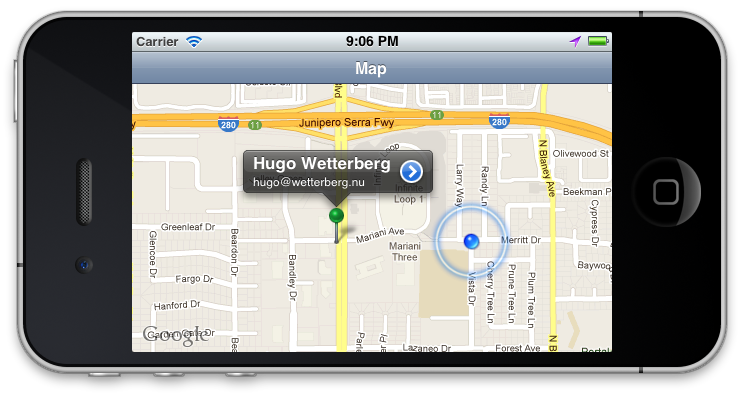
If it's the first time we get a position reading we're doing two things: one, deciding what part of the world we want to be shown on the map; and two, adding an annotation that tells us "Hugo was here".
The first part is the most obtuse of the two. What are map points, and how do they differ from coordinates? The difference between the two is that coordinates are composed of latitude and longitude (the position on a sphere/ellipsoid) while a map point describes a position on the flat, projected, surface of the map. In this case it's Googles variant of the Mercator projection that's being used, also see Mercator projection. But if (when) Apple switches to another mapping solution it will probably be another projection. That's why we should only ever store real coordinates and convert back and forth between map points and coordinates when needed.
When we tell the map view what part of the world we want it to show it expects a MKMapRect. The map rect is composed of a map point origin and a size in map points. What we calculate in the code sample above is a map rect that should be 1000m x 1000m and centered on our position. To do this we first have to convert our coordinate to a map point using MKMapPointForCoordinate(), then we use MKMapPointsPerMeterAtLatitude() to get the number of map points per meter at our latitude. When we get those numbers we can easily calculate the rectangle that should be visible by setting the rectangles origin to 500 meters worth of map points north and west of our point and make it 1000 meters worth of map points wide and high. Now that we have the rectangle we can show it using [MKMapView setVisibleMapRect:animated:].
Annotating the map
We left a part of the code hanging in the previous section: the annotation. Instances of any class that implements the MKAnnotation protocol can be added as annotations. To return the text that should be show in callouts the class should implement the title and subtitle methods. The HUWMapAnnotation class is a simple beast that implements the MKAnnotation protocol and has three properties of its own:
@interface HUWMapAnnotation : NSObject<MKAnnotation>

@property (strong) NSString *name;
@property (strong) NSString *email;
@property (assign) NSInteger age;

-(id)initWithCoordinate:(CLLocationCoordinate2D)coordinate;

@end
It also provides an init-method that accepts the coordinates that we're adding the annotation at. And it implements the title and subtitle methods from the MKAnnotation protocol by returning the name and email respectively.
Adding markers on long press
To add markers when the user long-presses the map we'll have to add a gesture recognizer to the map view. We do this in the viewDidLoad method in our view controller:
// Add a long press gesture recognizer to the map for
// adding new pins to the map
UILongPressGestureRecognizer *longPress =
    [[UILongPressGestureRecognizer alloc]
      initWithTarget:self
      action:@selector(mapLongPress:)];
longPress.minimumPressDuration = 1.0;
[self.mapView addGestureRecognizer:longPress];
This creates a gesture recognizer that will send the message mapLongPress: to our view controller when the user has pressed the map view for one second.
-(void)mapLongPress:(UIGestureRecognizer*)gesture {
    if (gesture.state != UIGestureRecognizerStateBegan)
        return;

    // Get the screen coordinates for the touch relative
    // to our map view.
    CGPoint point = [gesture locationInView:self.mapView];
    // Get the world coordinates that corresponds to
    // the screen coordinates.
    CLLocationCoordinate2D coordinates = [self.mapView
           convertPoint:point
           toCoordinateFromView:self.mapView];

    // Create and add an annotation with the coordinates.
    HUWMapAnnotation *annotation = [[HUWMapAnnotation alloc]
            initWithCoordinate:coordinates];
    annotation.name = @"Dropped pin";
    [self.mapView addAnnotation:annotation];
}
We want to add the marker as soon as the long-press is recognized, so we'll return immediately for all states except UIGestureRecognizerStateBegan. The next step is to do get the world coordinate from the position that the user long-pressed, the method is similar to what we did to get a map point from a coordinate, but in reverse. The [UIGestureRecognizer locationInView:] method gives us the point in the view, and the method [MKMapView convertPoint:toCoordinateFromView:] returns the coordinate for the point. Remember that we're talking about points here, not map points. The point in this case corresponds to screen coordinates relative to the bounds of the map view, not, like the map point, a position on the map.
The part where we add an annotation should be pretty self-explanatory, we're doing the same thing as before in "Reacting to location updates", just with less information.
Using the storyboard
If you take a look at the storyboard we have a segue identified by "showPinDetails" that doesn't start at a button or other interactive control, but connects our view controller directly to the detail view controller. We can trigger this controller when the user presses the callout accessory and supply the annotation to the detail view controller in prepareForSegue:sender:.
-(void)mapView:(MKMapView *)mapView annotationView:(MKAnnotationView *)view calloutAccessoryControlTapped:(UIControl *)control{
    //Check if the annotation is of our annotation class
    if ([view.annotation isKindOfClass:[HUWMapAnnotation class]]) {
        // Store a reference to the annotation so that we can pass it on in prepare for segue.
        selectedAnnotation = view.annotation;
        [self performSegueWithIdentifier:@"showPinDetails" sender:self];
    }
}

-(void)prepareForSegue:(UIStoryboardSegue *)segue sender:(id)sender {
    // Check that the segue is our showPinDetails-segue
    if ([segue.identifier isEqualToString:@"showPinDetails"]) {
        // Pass the annotation reference to the detail view controller.
        HUWDetailViewController *detail = [segue destinationViewController];
        detail.annotation = selectedAnnotation;
    }
}
The reason we can pass on our annotation this way is that we know that we can assume that the destination view controller is our HUWDetailViewController and we have defined a HUWMapAnnotation property called annotation in it. The rest of the app is pretty basic, we pick up on the info in the annotation and show it in the detail view, and that's pretty much it.
The end
I hope that this introduction to the map view specific stuff can be useful. If the article itself feels too sparse, remember to check out the code and tweak and mess around with it, that's the best way to learn.